
 日本語
日本語 Vietnamese
Create voice chat app using Twilio SDK in iOS
Introduction
As described in previous post , today I will show you how to build a simple chat voice iOS app using Twilio Video SDK.
Overview, Twilio Video is a well known platform providing many services to build experiences with video: real-time video, voice, and screen sharing. It received so much good response from customers globally.
https://www.g2.com/products/twilio/reviews
https://www.trustradius.com/products/twilio-video/reviews
In this post we will try using Video API to build a voice chat application.
Create an project in Twilio
Create an account at Twillo
Go to console page
Create a new project name “TwilioDemoChat” or any name as you want at link
After created app, a welcome page will be shown

Choose “Other” and skip to dashboard to finish creating project step.

Save ACCOUNT SID and AUTH TOKEN in somewhere so that you can use later.
Create API Key
Create a new api key and save it securely in somewhere, because this just be shown in ONCE TIME.
Create Access Tokens
Go to this link to create 2 new access tokens. We are going to test with 2 users connect to the same room name “TwilioDemoChatRoom” and has client identifies are “TwilioDemoChatRoomUser1” and “TwilioDemoChatRoomUser1”, so that click on “Generate Access Token” to get access tokens for that room, save 2 access tokens so we can use in iOS side.
NOTE:In a production application, your back-end server will need to generate an Access Token for every user in your application. An Access Token is a short-lived credential used to authenticate your client-side application to Twilio.


Implement Voice Chat in iOS
Create a new project named “TwilioDemoChat”

Configure CocoaPods
Create a empty file named PodFile put in root project’s directory and paste following commands:
platform :ios,'11.0'
use_frameworks!

def install_pods
  pod 'TwilioVideo'
  pod 'MBProgressHUD'
end

target 'TwilioDemoChat' do
  install_pods
end
Open Terminal app then run following command at project’s root directory to install TwilioVideo SDK:
pod install
Because our application need to use micro for voice chat so we need to add micro permission to info.plist
NSMicrophoneUsageDescription
This sample uses a mic device for voice chat
Implement Twilio
First we need a controller to handle joining room,.. named TwilioController.swift
import UIKit
import TwilioVideo
import MBProgressHUD

let TWILIO_TEST_ROOM = "TwilioDemoChatRoom"
let TWILIO_ACCESS_TOKEN_1 = "access_token_generated_from_step_Create_Access_Tokens"
let TWILIO_ACCESS_TOKEN_2 = "access_token_generated_from_step_Create_Access_Tokens"

let kTwilioController = TwilioController.shared

public enum RoomStatus{
    case Connected
    case Disconnected
    case ParticipantConnected
    case ParticipantDisconnected
    case Error
}

public typealias RoomStatusUpdatedHandler = (RoomStatus) -> (Void)

class TwilioController: NSObject {
    static let shared = TwilioController()

    var room:Room? = nil
    var connected = false
    var roomStatusHandler:RoomStatusUpdatedHandler?

    private var localAudioTrack = LocalAudioTrack()

    //connect to room defined in TWILIO_TEST_ROOM
    func  connectToRoom(handler:RoomStatusUpdatedHandler?) {
        roomStatusHandler = handler
        let connectOptions = ConnectOptions(token: TWILIO_ACCESS_TOKEN_2) { (builder) in
            builder.roomName = TWILIO_TEST_ROOM

            //setup local audio track
            if let audioTrack = self.localAudioTrack {
                builder.audioTracks = [ audioTrack ]
            }
        }
        room = TwilioVideoSDK.connect(options: connectOptions, delegate: self)
    }

    func disconnectFromRoom()  {
        room?.disconnect()
    }

    // MARK: - Private methods
    private func toastMessage(message:String){
        print("toastMessage \(message)")
        DispatchQueue.main.asyncAfter(deadline: .now() ) {
            let hud = MBProgressHUD.showAdded(to: UIApplication.shared.keyWindow!, animated: true)
            hud.mode = .text
            hud.label.text = message
            hud.removeFromSuperViewOnHide = true
            hud.hide(animated: true, afterDelay: 2)
        }
    }
}

extension TwilioController : RoomDelegate{

    //event when did connect to room
    func roomDidConnect(room: Room) {
        connected = true
        roomStatusHandler?(.Connected)
    }

    //event when did disconnect to room
    func roomDidDisconnect(room: Room, error: Error?) {
        connected = false
        roomStatusHandler?(.Disconnected)
    }

    //event when can't connect to room, because of timeout or network error..
    func roomDidFailToConnect(room: Room, error: Error) {
        connected = false
        roomStatusHandler?(.Error)
    }

    //event when participant joined the room
    func participantDidConnect(room: Room, participant: RemoteParticipant) {
        let message = "participant \(participant.identity) connected"
        toastMessage(message: message)
        roomStatusHandler?(.ParticipantConnected)
    }

    //event when participant left the room
    func participantDidDisconnect(room: Room, participant: RemoteParticipant) {
        let message = "participant \(participant.identity) disconnected"
        toastMessage(message: message)
        roomStatusHandler?(.ParticipantDisconnected)
    }
}
Mainly, this controller has 2 main functions:
– connectToRoom(): connect to specific room defined as TWILIO_TEST_ROOM and specific access token (TWILIO_ACCESS_TOKEN_1 or TWILIO_ACCESS_TOKEN_2), if you try running in physical devices, set different access token for each device. This function has callback to handle events like:
- Connected: current user connected to room
- Disconnected: current user disconnected from room
- ParticipantConnected: other participant connected to room
- ParticipantDisconnected: other participant disconnected from room
– disconnectFromRoom(): simply disconnect from room
Then we create a sample view controller named CallViewController like following
in CallViewController.swift we include following code
import UIKit
import MBProgressHUD

class CallViewController: UIViewController {

    @IBOutlet weak var joinButton: UIButton!
    @IBOutlet weak var roomTxt: UITextField!

    //when joined status update, update button title also
    private var joined = false{
        didSet{
            if joined {
                joinButton.setTitle("End call", for: .normal)
            }else{
                joinButton.setTitle("Join", for: .normal)
            }
        }
    }
    override func viewDidLoad() {
        super.viewDidLoad()
        roomTxt.text = TWILIO_TEST_ROOM
    }

    @IBAction func joinRoom(_ sender: Any) {
        if !joined{
            MBProgressHUD.showAdded(to: self.view, animated: true)
            kTwilioController.connectToRoom { (status) -> (Void) in
                if status == .Connected {
                    self.joined = true
                }
                if status == .Disconnected{
                    self.joined = false
                }
                MBProgressHUD.hide(for: self.view, animated: true)
            }

        }else{
            kTwilioController.disconnectFromRoom()
        }

    }

}
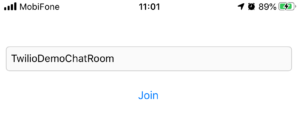
Simply, we have a textfield to display test room name(TwilioDemoChatRoom, not editable), with a button to Join or End Call (we detect the room’s status has changed to update button’s title and call function connectToRoom() or disconnectFromRoom() properly).
Now you run project in 2 devices (simulator not supported) to check how it works. Remember to change access token for each device when running.
Refs: