
 日本語
日本語 Vietnamese
Deploying Node app to ECS with Docker
In this tutorial, I’ll walk you through the steps on how to dockerize a Node.js application and then deploy it to Amazon Web Services (AWS) using Amazon Elastic Container Registry (ECR) and Amazon Elastic Container Service (ECS). We’ll do it in follow under:
1) Environment Setup
Node and Npm: Follow this link to install the latest versions.
Docker: Follow this link to install the latest versions.
AWS account: Sign up for a free tier.
AWS CLI: Follow the instructions for your OS.
2) Overview of Docker and AWS
Docker is open source software that allows you to pack an application together with its required dependencies and environment variables in a container that you can ship and run anywhere. It is independent of platforms or hardware, and therefore the containerized application can run in any environment in an isolated fashion.
Amazon Web Services (AWS) offers a reliable, scalable, and inexpensive cloud computing service. As I mentioned before, this tutorial will focus on using the ECR and ECS services of AWS.
3) The Node.js app to deploy
Let’s quickly build a sample app that we’ll use for the purpose of this tutorial. It going to be very simple Node.js app.
Enter the following in your terminal:
// create a new directory
$ mkdir ecs-nodejs-app

// change to new directory
$ cd ecs-nodejs-app

// Initialize npm
$ npm init -y

// install express
$ npm install express

// create an server.js file
$ touch server.js
Open server.js and paste the code below into it:
// server.js

const express = require('express')
const app = express()

app.get('/', (req, res) => {
res.send('Welcome from a Node.js app!')
})

app.listen(3000, () => {
console.log('Server is up on 3000')
})
Start the app with:
$ node server.js
Access it on http://localhost:3000. You should get Welcome from a Node.js app! displayed in your browser.
Next, we’re going to dockerize our app.
4) Writing a Dockerfile
We are going to start dockerizing the app by creating a single file called a Dockerfile in the base (root) of our project directory. This file has no file extension.
FROM node:8-alpine
RUN mkdir -p /usr/src/app
WORKDIR /usr/src/app
COPY . .
RUN npm install
EXPOSE 3000
CMD [ "node", "server.js" ]
5. Building a Docker image
Make sure you have Docker up and running. Now that we have defined our Dockerfile, let’s build the image with a title using -t:
$ docker build -t ecs-nodejs-app .
6. Running a Docker Container
We’ve built the docker image. To see previously created images, run:
$ docker images
You should see the image we just created as the most recent based on time:

Copy the Image Id. To run the container, we write on the terminal:
$docker run -p 80:3000 {image-id}

// fill with your image-id
Here we publish the app to port 80:3000. Because we are running Docker locally, go to http://localhost to view.

7. Create the registry and push your app image there
Amazon Elastic Container Registry (ECR) is a fully-managed Docker container registry that makes it easy for developers to store, manage, and deploy Docker container images. Amazon ECR is integrated with Amazon Elastic Container Service (ECS), simplifying your development to production workflow.
Before we get to pushing up our app image, ensure that your AWS CLI can connect to your AWS account. Run on the terminal:
$ aws configure
If your AWS CLI was properly installed, aws configure will ask for the following:
$ aws configure
AWS Access Key ID [None]: <accesskey>
AWS Secret Access Key [None]: <secretkey>
Default region name [None]: us-east-2
Default output format [None]:
Confirm that your AWS CLI is properly configured by once again running the aws configure command and pressing enter at each prompt to accept:

Steps to create the registry for your images:
Go to the AWS console and sign in.
Under the Services dropdown menu, under Containers, select ECS:

On the left menu, under Amazon ECR, go to Repositories then click Create Repository. Enter a name , for example, use ecs-nodejs-app after click button “Create Repository”.


Then click on View Push Commands on the upper right and follow the 4 instructions from the AWS console for building, tagging, and pushing your Docker image:

Now go to your Amazon ECR and click on your repository name and you should see your Docker image there. Copy the Image URI and keep it handy, we’ll need to paste it in the next step:

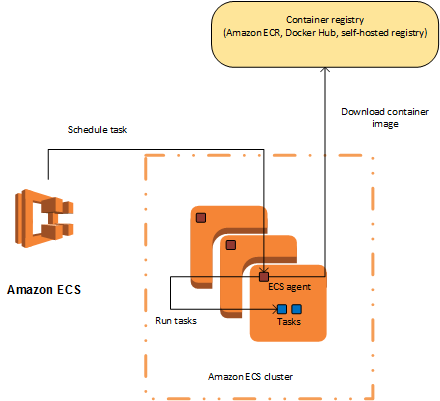
Next we’ll create the Task, Service, and Cluster to run this Docker image on an EC2 instance.
8. Create the Task Definition
Tasks on AWS function just like the docker run command on the Docker CLI. They define:
Container images
Volumes
Networks Environment Variables
Port mappings
Steps to create a new Task Definition:
- From Task Definitions in the ECS dashboard (on the left), click on the Create new Task Definition button.
- Select EC2 as the launch type.
- Give your task a name (for example: ecs-nodejs-app-task), then skip the next few fields and scroll down to and click on Add container.
- Give the container a name (for example: ecs-nodejs-app-container).
- Past your Image URI.
- Set Memory Limits to Soft Limit: 512
- Map your ports (for example, 80: 3000), leave protocol as TCP
- Scroll down to Environment Variables and set “NODE_ENV” as the key and “production” as the value.
- Skip everything else, scroll to the bottom and click Add.
- Back in your Create Task Definition window, you should see your container loaded with your image, then scroll down and click Create

9. Create a Cluster
Steps to Create a Cluster:

- From the Services dropdown, select ECS to go back to your ECS dashboard.
- From the left menu, under Amazon ECS (not EKS), click on Clusters, then Create Cluster
- Select EC2 Linux + Networking as the cluster template.
- Name your cluster (for example: ecs-nodejs-app-cluster).
- Leave it as an On-Demand Instance and select t2.micro under the EC2 Instance Type dropdown.
- Set number of instances to 1, and EBS Storage to 30.
- You can leave the Key pair as none or select a keypair if you want to have the ability to SSH into your instance.
- Under Networking, set VPC as Create a new VPC, then scroll down.
- Under Container instance IAM role, select the role we just created (for example: ECStoEC2role), then click Create.

It’ll take a few minutes to finish processing. Once processed, you should be able to click on View Cluster and see the status set to Active.
10. Create a Service to run the Cluster
Now let’s create a service to run this cluster.

Steps to create a Service:
- From the ECS left menu, click on Task Definition, then select your task (for example: ecs-nodejs-app-task).
- Click on the latest revision.
- From the Actions drop down (next to Create new revision), select Create Service.
- On the Configure Service page, select EC2 as the Launch type.
- Set Cluster to the name of our cluster (for example: ecs-nodejs-app-cluster)
- Name your service (for example: ecs-nodejs-app-service)
- Set Number of Tasks to 1.
- Skip through all the other fields and pages and on page 4, scroll down and click on Create Service.
- On the Launch Status page, you should see green checks for Create service discovery service and Service created. Click on View Service. If the status in the Tasks tab is pending, give it a few minutes and then it will be Running (click on the refresh icon on the right).

Go to Cluster (through a link from the service we just created) > EC2 instances > Click on the container instance to reveal the public DNS.


Visit the public DNS to view our app!

Link the code for the Docker part from Github.
References
https://docs.aws.amazon.com/AmazonECS/latest/developerguide/getting-started.html
https://blog.clairvoyantsoft.com/deploy-and-run-docker-images-on-aws-ecs-85a17a073281